
by John Clayson
Grantham Yard signal box occupied a prominent location at the south end of the Up, or southbound, main line platform. It features in many classic photographs of the southern end of the passenger station.
Grantham Yard was the third largest of the four signal boxes which were in operation at Grantham between 1881 and 1968. After an upgrade in 1903 its locking frame had 50 levers until it closed in 1971. Like the other Grantham boxes the Yard Box was staffed round the clock in three shifts by a Signalman, but there was not normally a Telegraph Lad on duty.
Its official name was 'Grantham Yard' signal box, but its nameboards simply read 'Yard Box' and locally it was generally referred to by that name.
Here are some photographs which help to place the Yard Box in the context of the track layout and traffic flows at the south end of the passenger station.
A General View
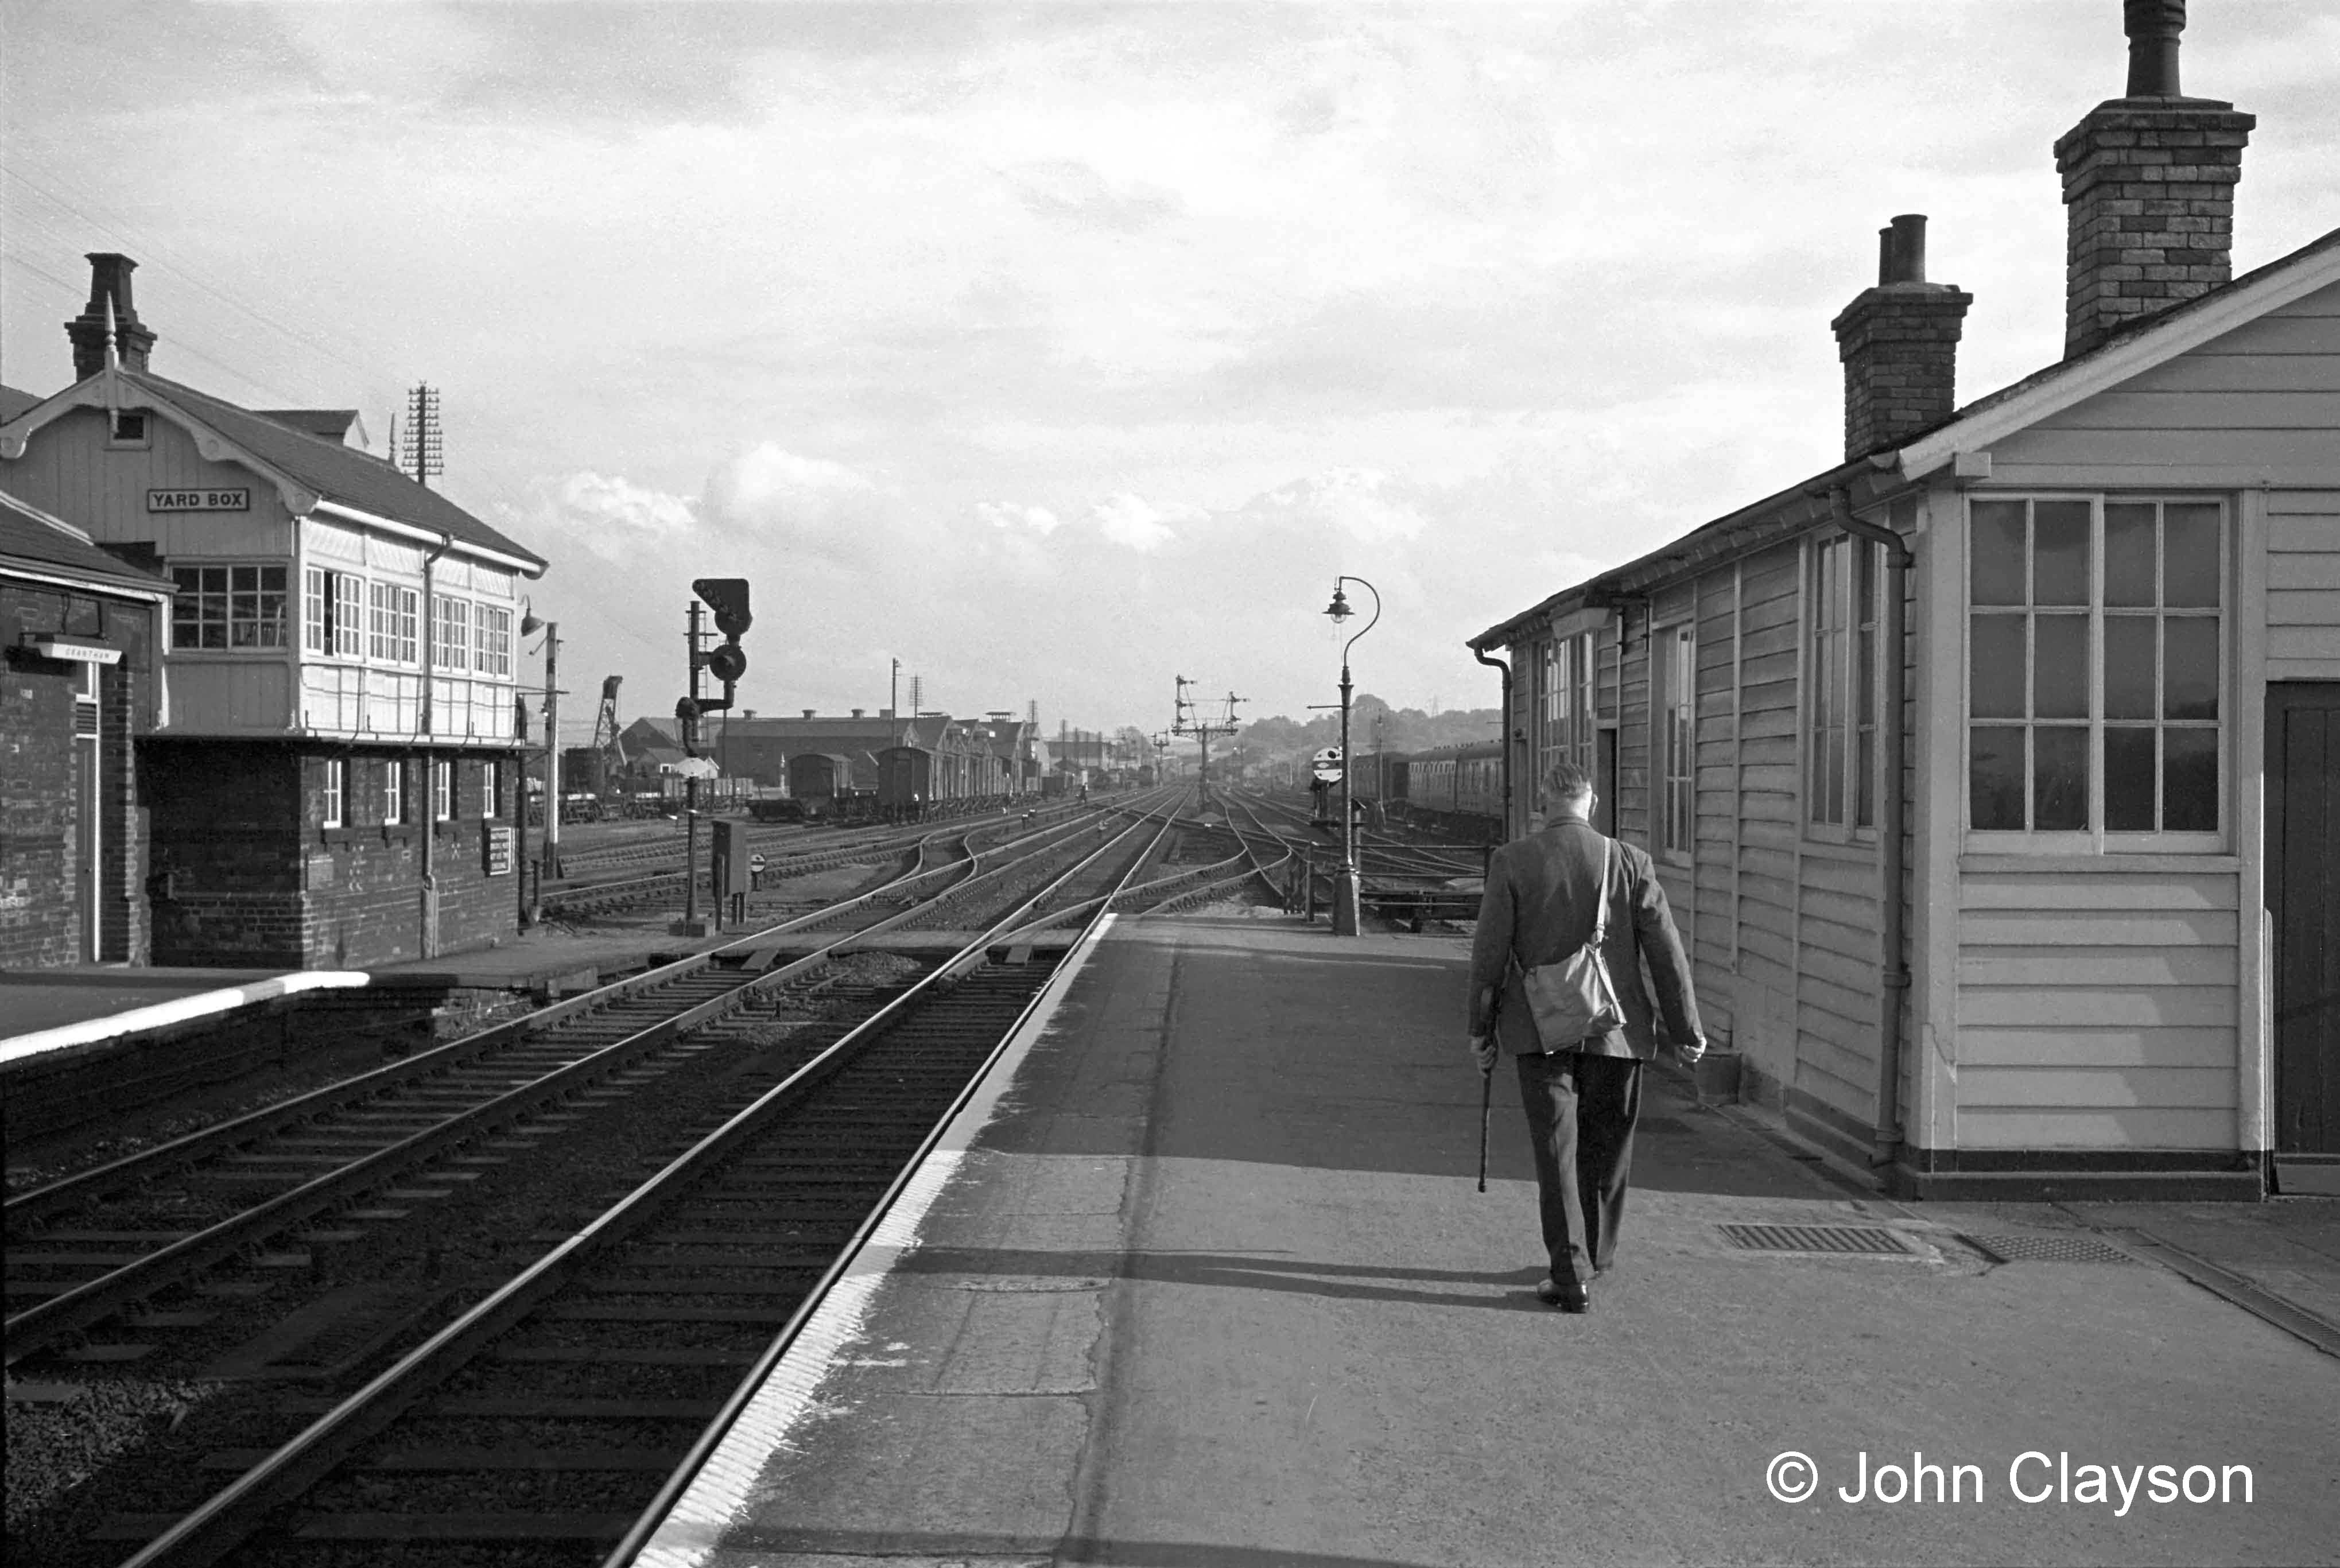
Leading in from the left is the Up (southbound) Main line. The colour light signal controls its connection, just beyond the barrow crossing, with the Up Goods line.
Approaching from the far distance, and to the left of the prominent semaphore signals, is the Down (northbound) Main line.
Approaching to the right of the same semaphore signal is the Down Slow line, leading to the Western platform which is on the other side of the wooden building on our right. There is a connection into the Down Main line at the platform end.
Just discernible this side of the signal post is a series of diagonal crossings which connect the Western platform with three of the four running lines (Up Goods, Up Main and Down Slow) - please see the enlarged view below.
Photograph by Cedric A. Clayson.
These arrangements provided good flexibility of operation in a relatively compact area, at the cost of quite complex trackwork. The crossings required regular maintenance under the heavy traffic conditions of this busy section of the East Coast Main Line.
On the left are the up side sidings and goods yard. Despite its proximity and its name by this time there were no connections with these sidings at the Yard Box; the up side sidings connected with the running lines in the distance, at the South Box.
Photograph by Cedric A. Clayson.
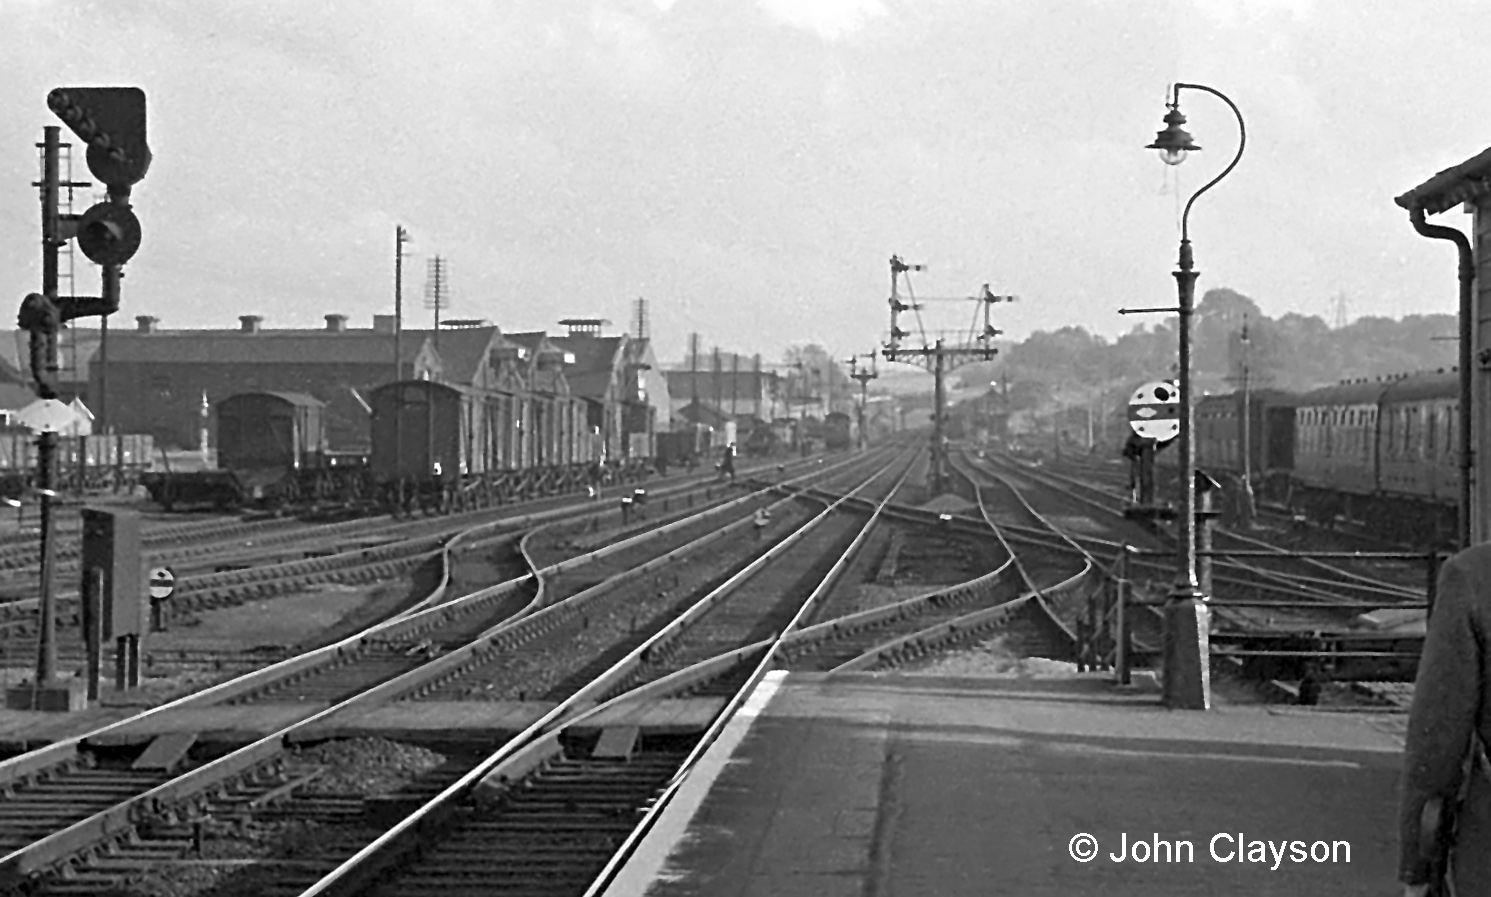
All the connections with the line which crosses diagonally from the bottom right corner to the Western platform on the left were under the control of Grantham Yard box.
The disc signals facing the camera control shunting movements towards the station platforms. On the right the lofty pole route carries telegraph and telephone communication along the eastern side of the railway.
Photograph by Noel Ingram.
Photograph by Noel Ingram.
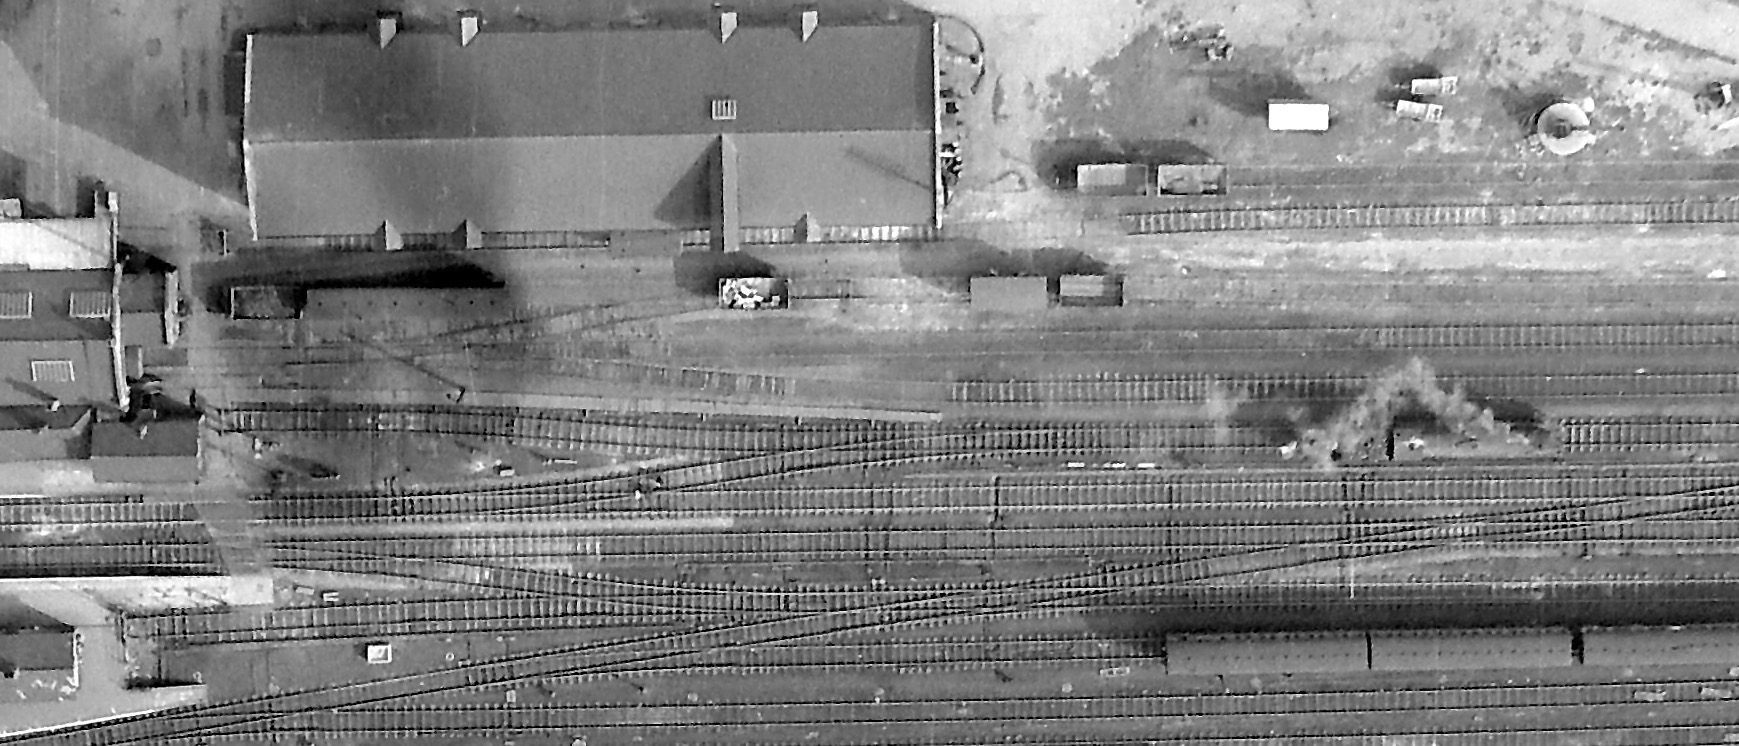
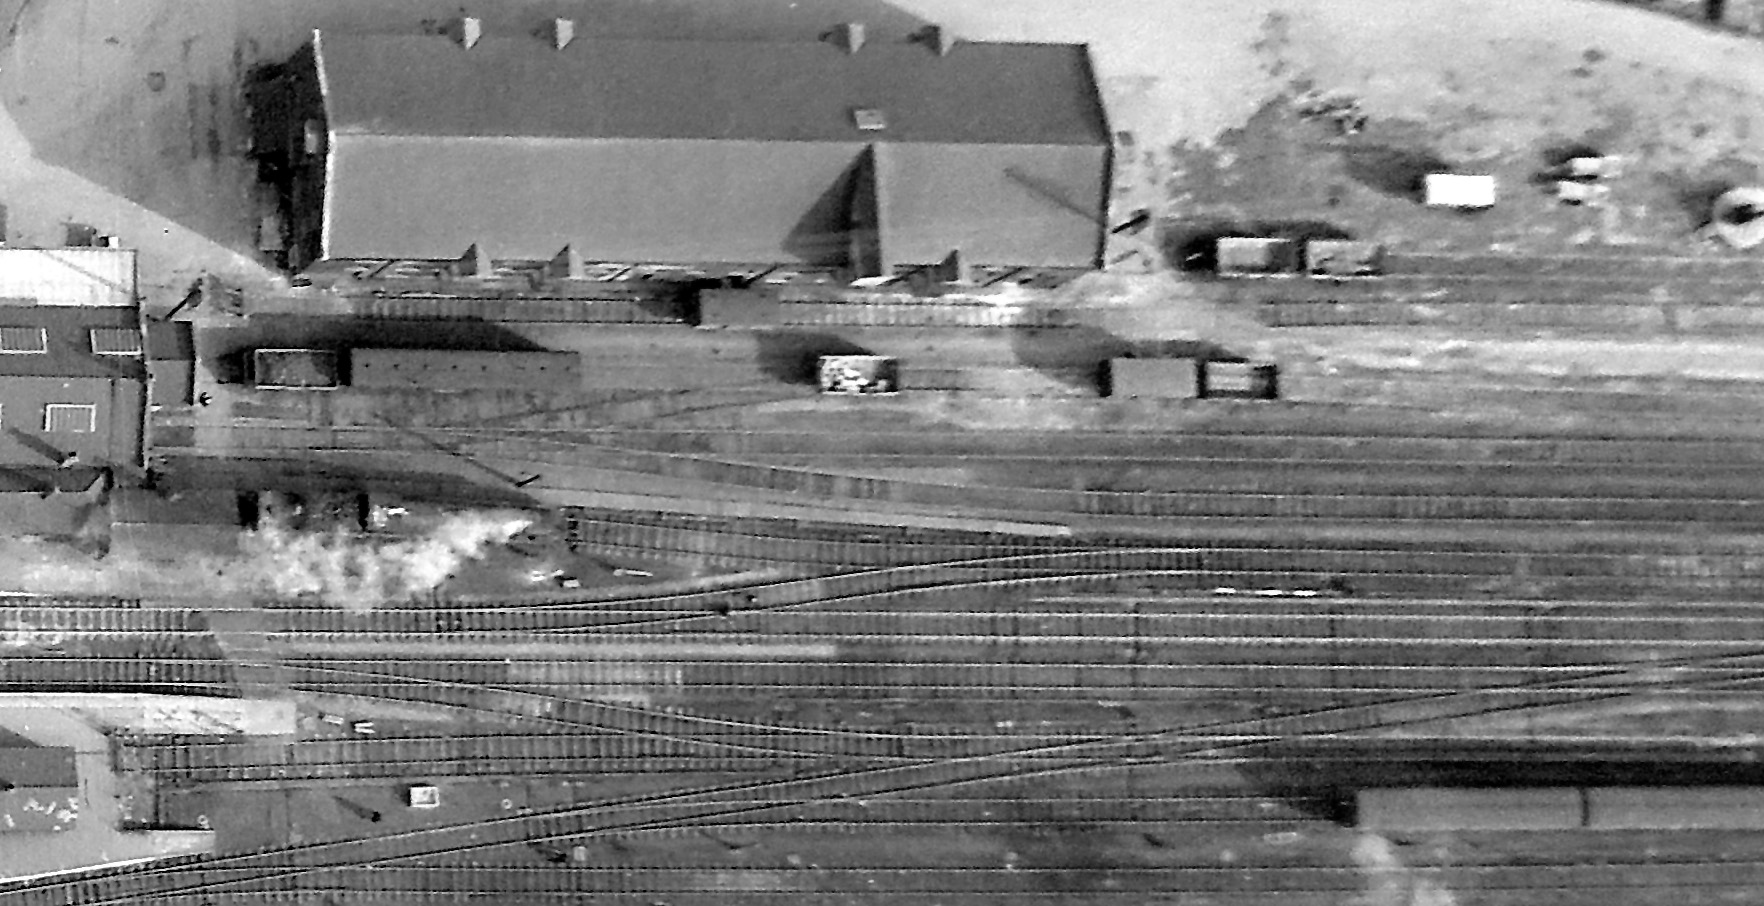
A View from Above
The Yard Box was at the end of a row of offices at the south end of the platform and it backed onto the goods shed.
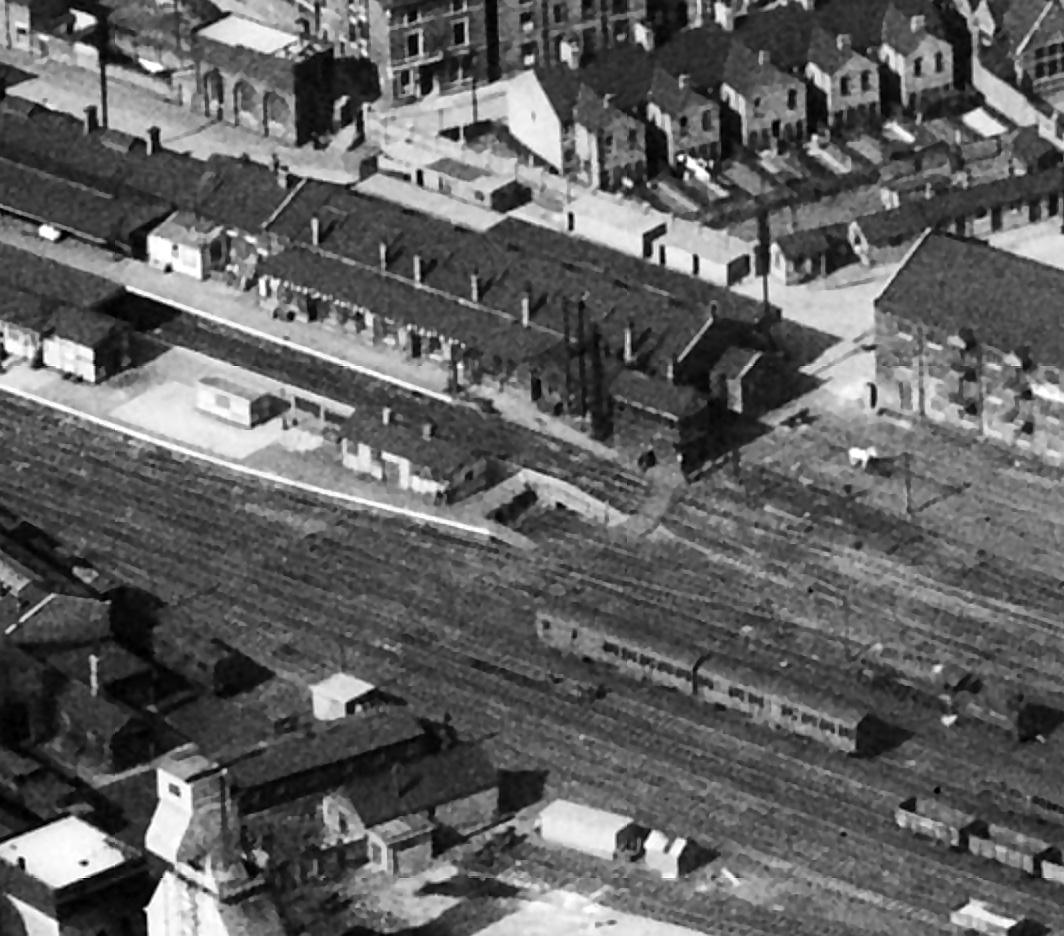
The station platforms and buildings lie to its left, with the station water tower near the top left corner, across Station Road.
At lower left are the Loco Department offices and workshops, with the top of the shed water tower and the coaling plant at the bottom left corner.
Photograph from Britain From Above © English Heritage.
The Main Lines
The Up Main and Down Main lines passed in front of the box, on its western side.
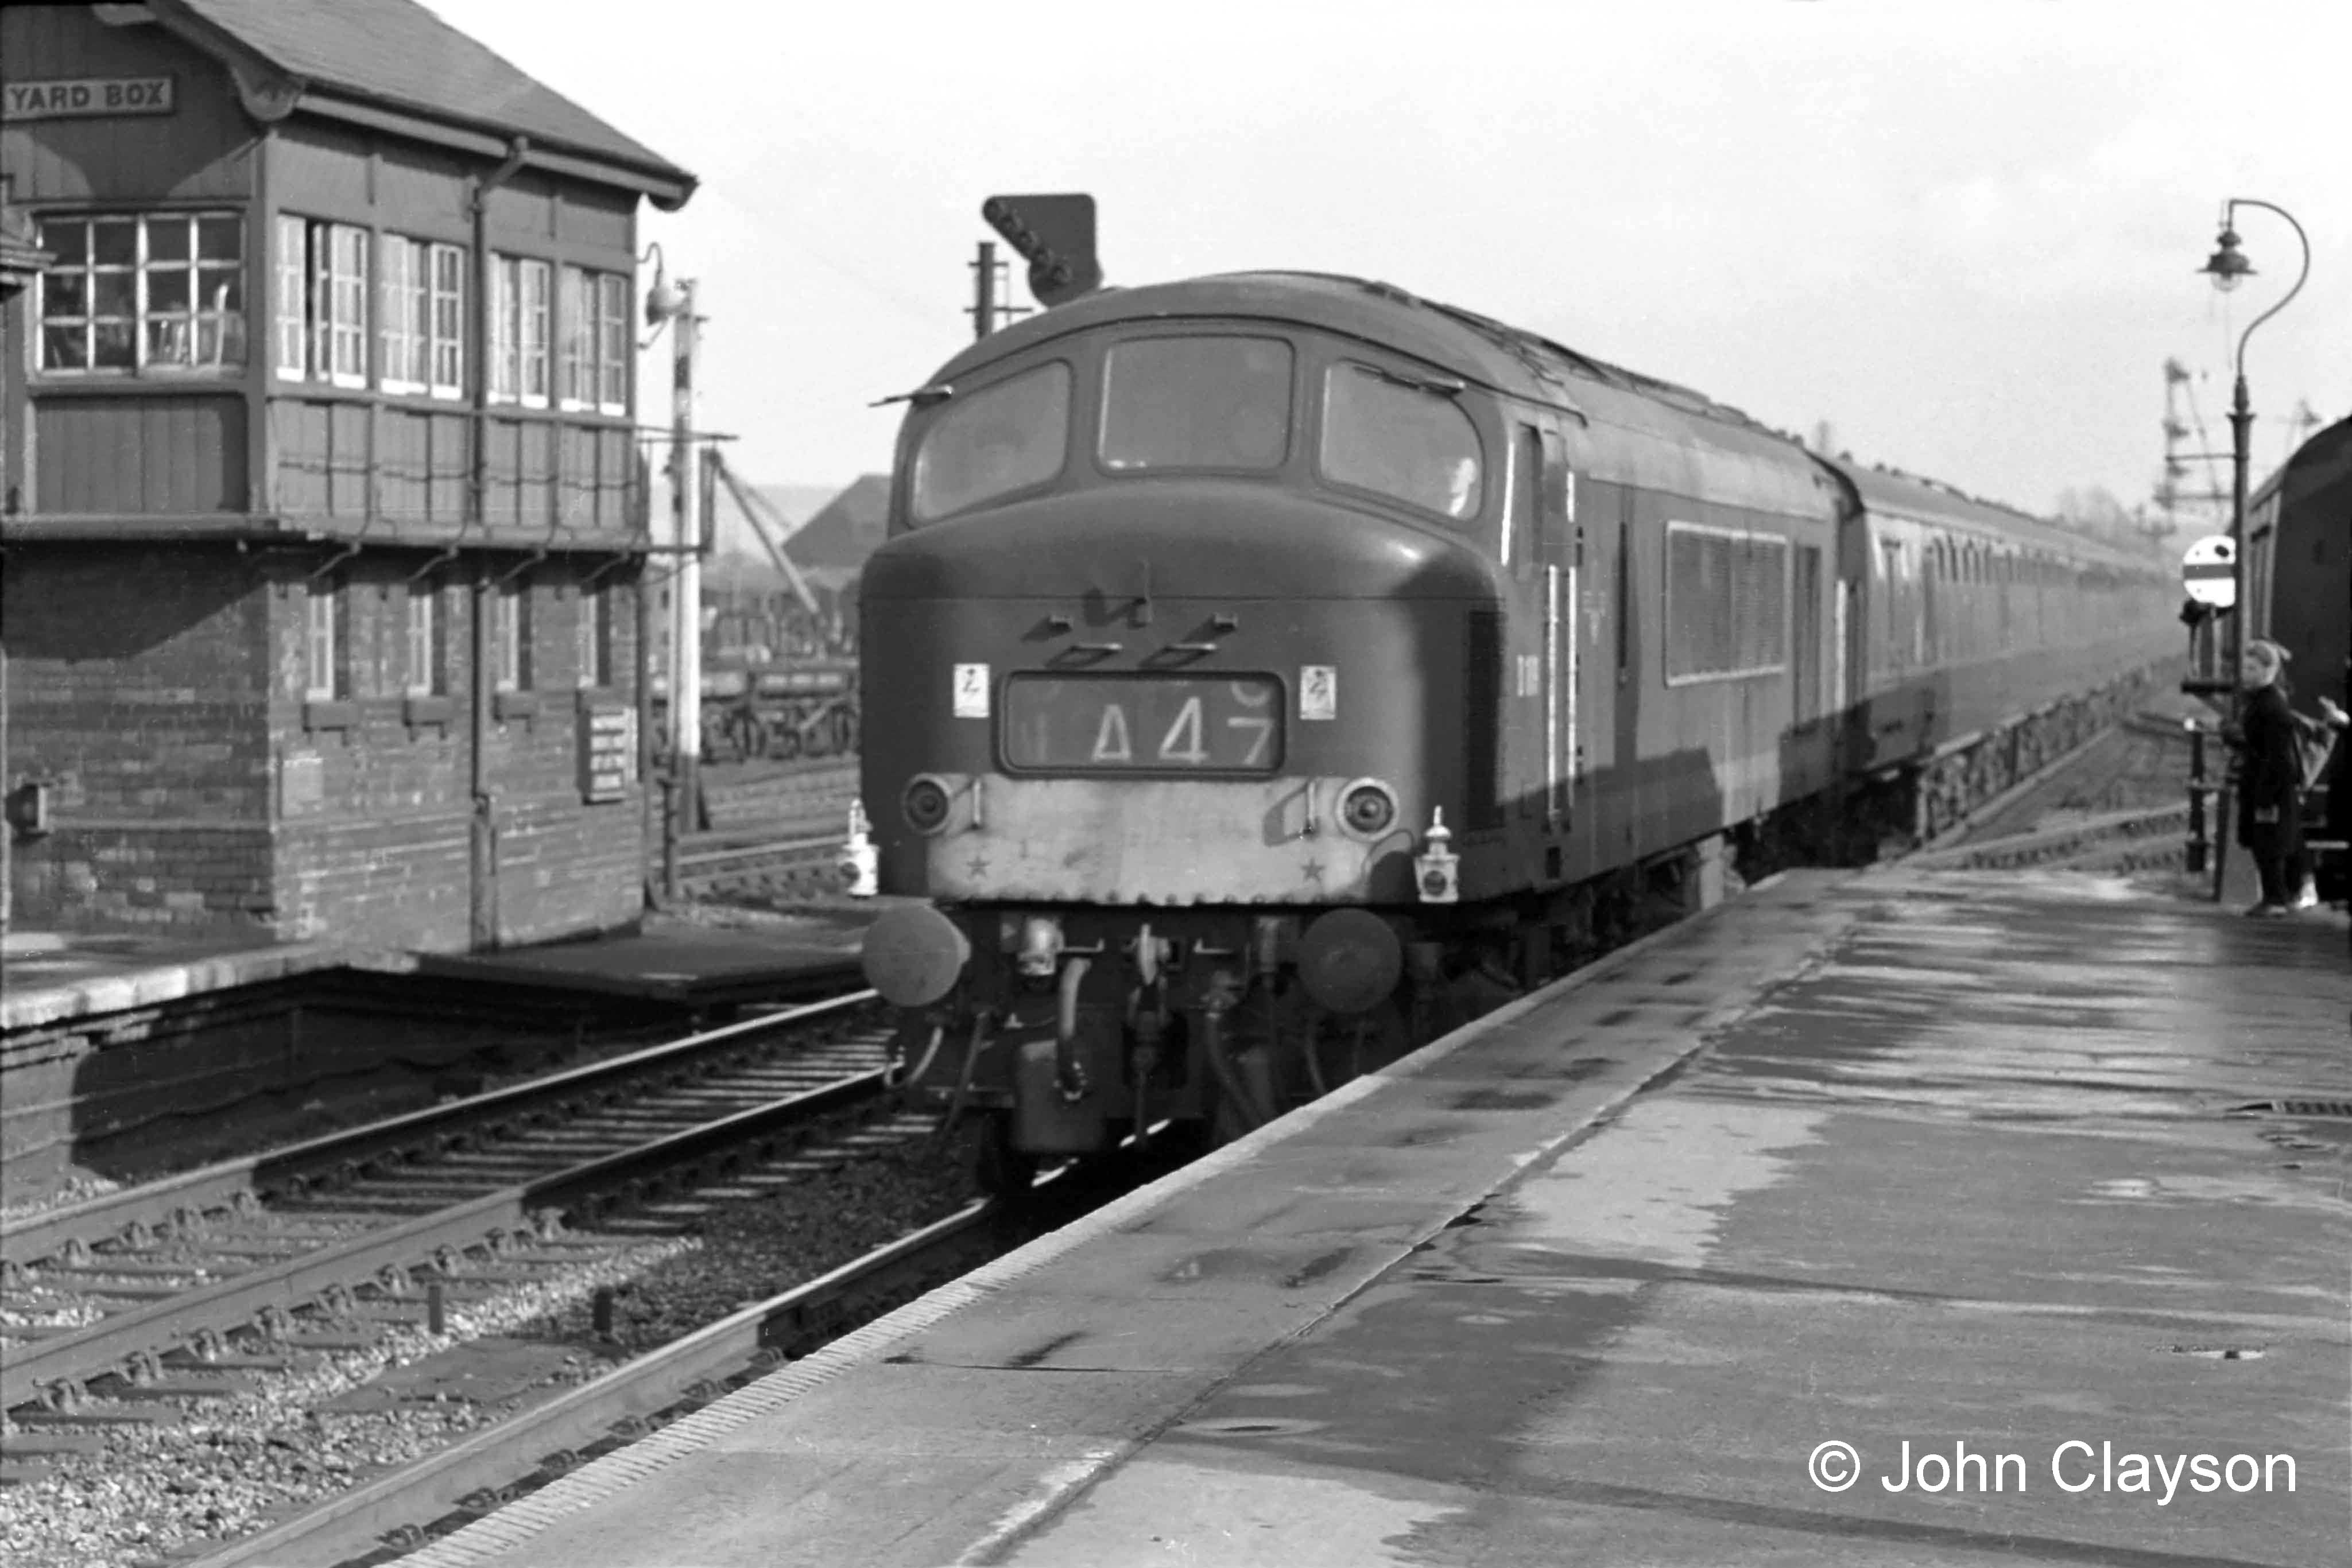
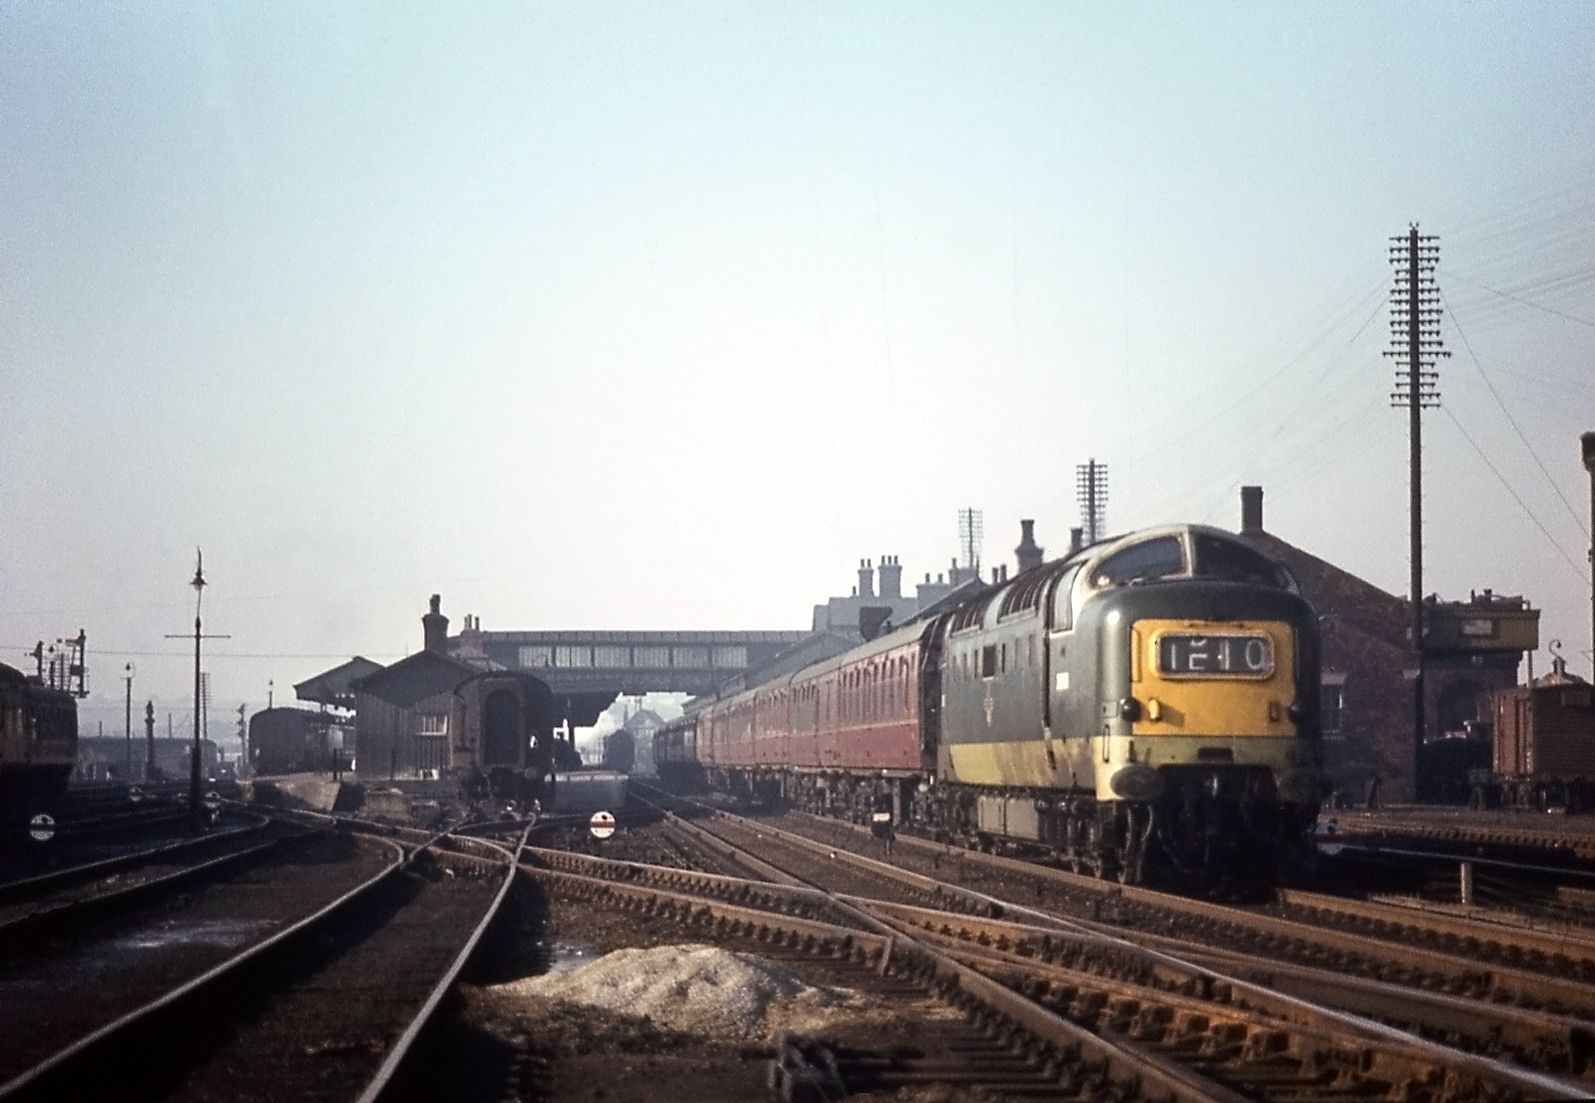
Train 1A47 would be the southbound The Heart of Midlothian at that time, so it would seem that this locomotive has faulty train indicator blinds. It is also carrying 'Class 1' express passenger train oil headlamps, as used on steam locomotives, which may be intended to show that the indicator blinds are not to be relied upon. Peak locomotives seemed prone to this problem. This could possibly be service 1A42, the 15:00 from King's Cross to Newcastle, which would be at Grantham around 16:45.
Photograph by Cedric A. Clayson.

The colour light signal on the left is the Up Main line home signal of Grantham Yard signal box. It is a junction signal for the Up Goods line and also a distant signal for the next box to the south, Grantham South. Therefore the main aspect could show either red, yellow or green depending on the positions of the relevant levers in both boxes.
If the Yard Box signalman set the diverging route onto the Up Goods line the inclined row of five white lights (known as a 'feather') would also illuminate. Below and to the left of the main aspect is an inclined row of two white lamps. These were illuminated to permit a short distance shunting movement onto the Goods line, for example when a locomotive arrived from the shed (via the North box and the Up Main line) in preparation for an engine change, and it was only to proceed along the Goods line for a few yards, before setting back into the into the locomotive spur, which is behind the signal, to await the arrival of its train.
The white diamond attached to the signal post informs locomotive crews that the line at that point is monitored by a track-circuit, an electrical system which detects the presence of a train and provides a visual indication to the signalman.
Disc signals controlled shunting movements. On the left, just beyond the flat cabinet, is a disc signal which released a waiting locomotive from the engine spur. On the right, behind the gas lamp post, is a disc signal which allowed a movement out of the Down platform through the connection to the Down Slow line.
Photograph by Cedric A. Clayson.
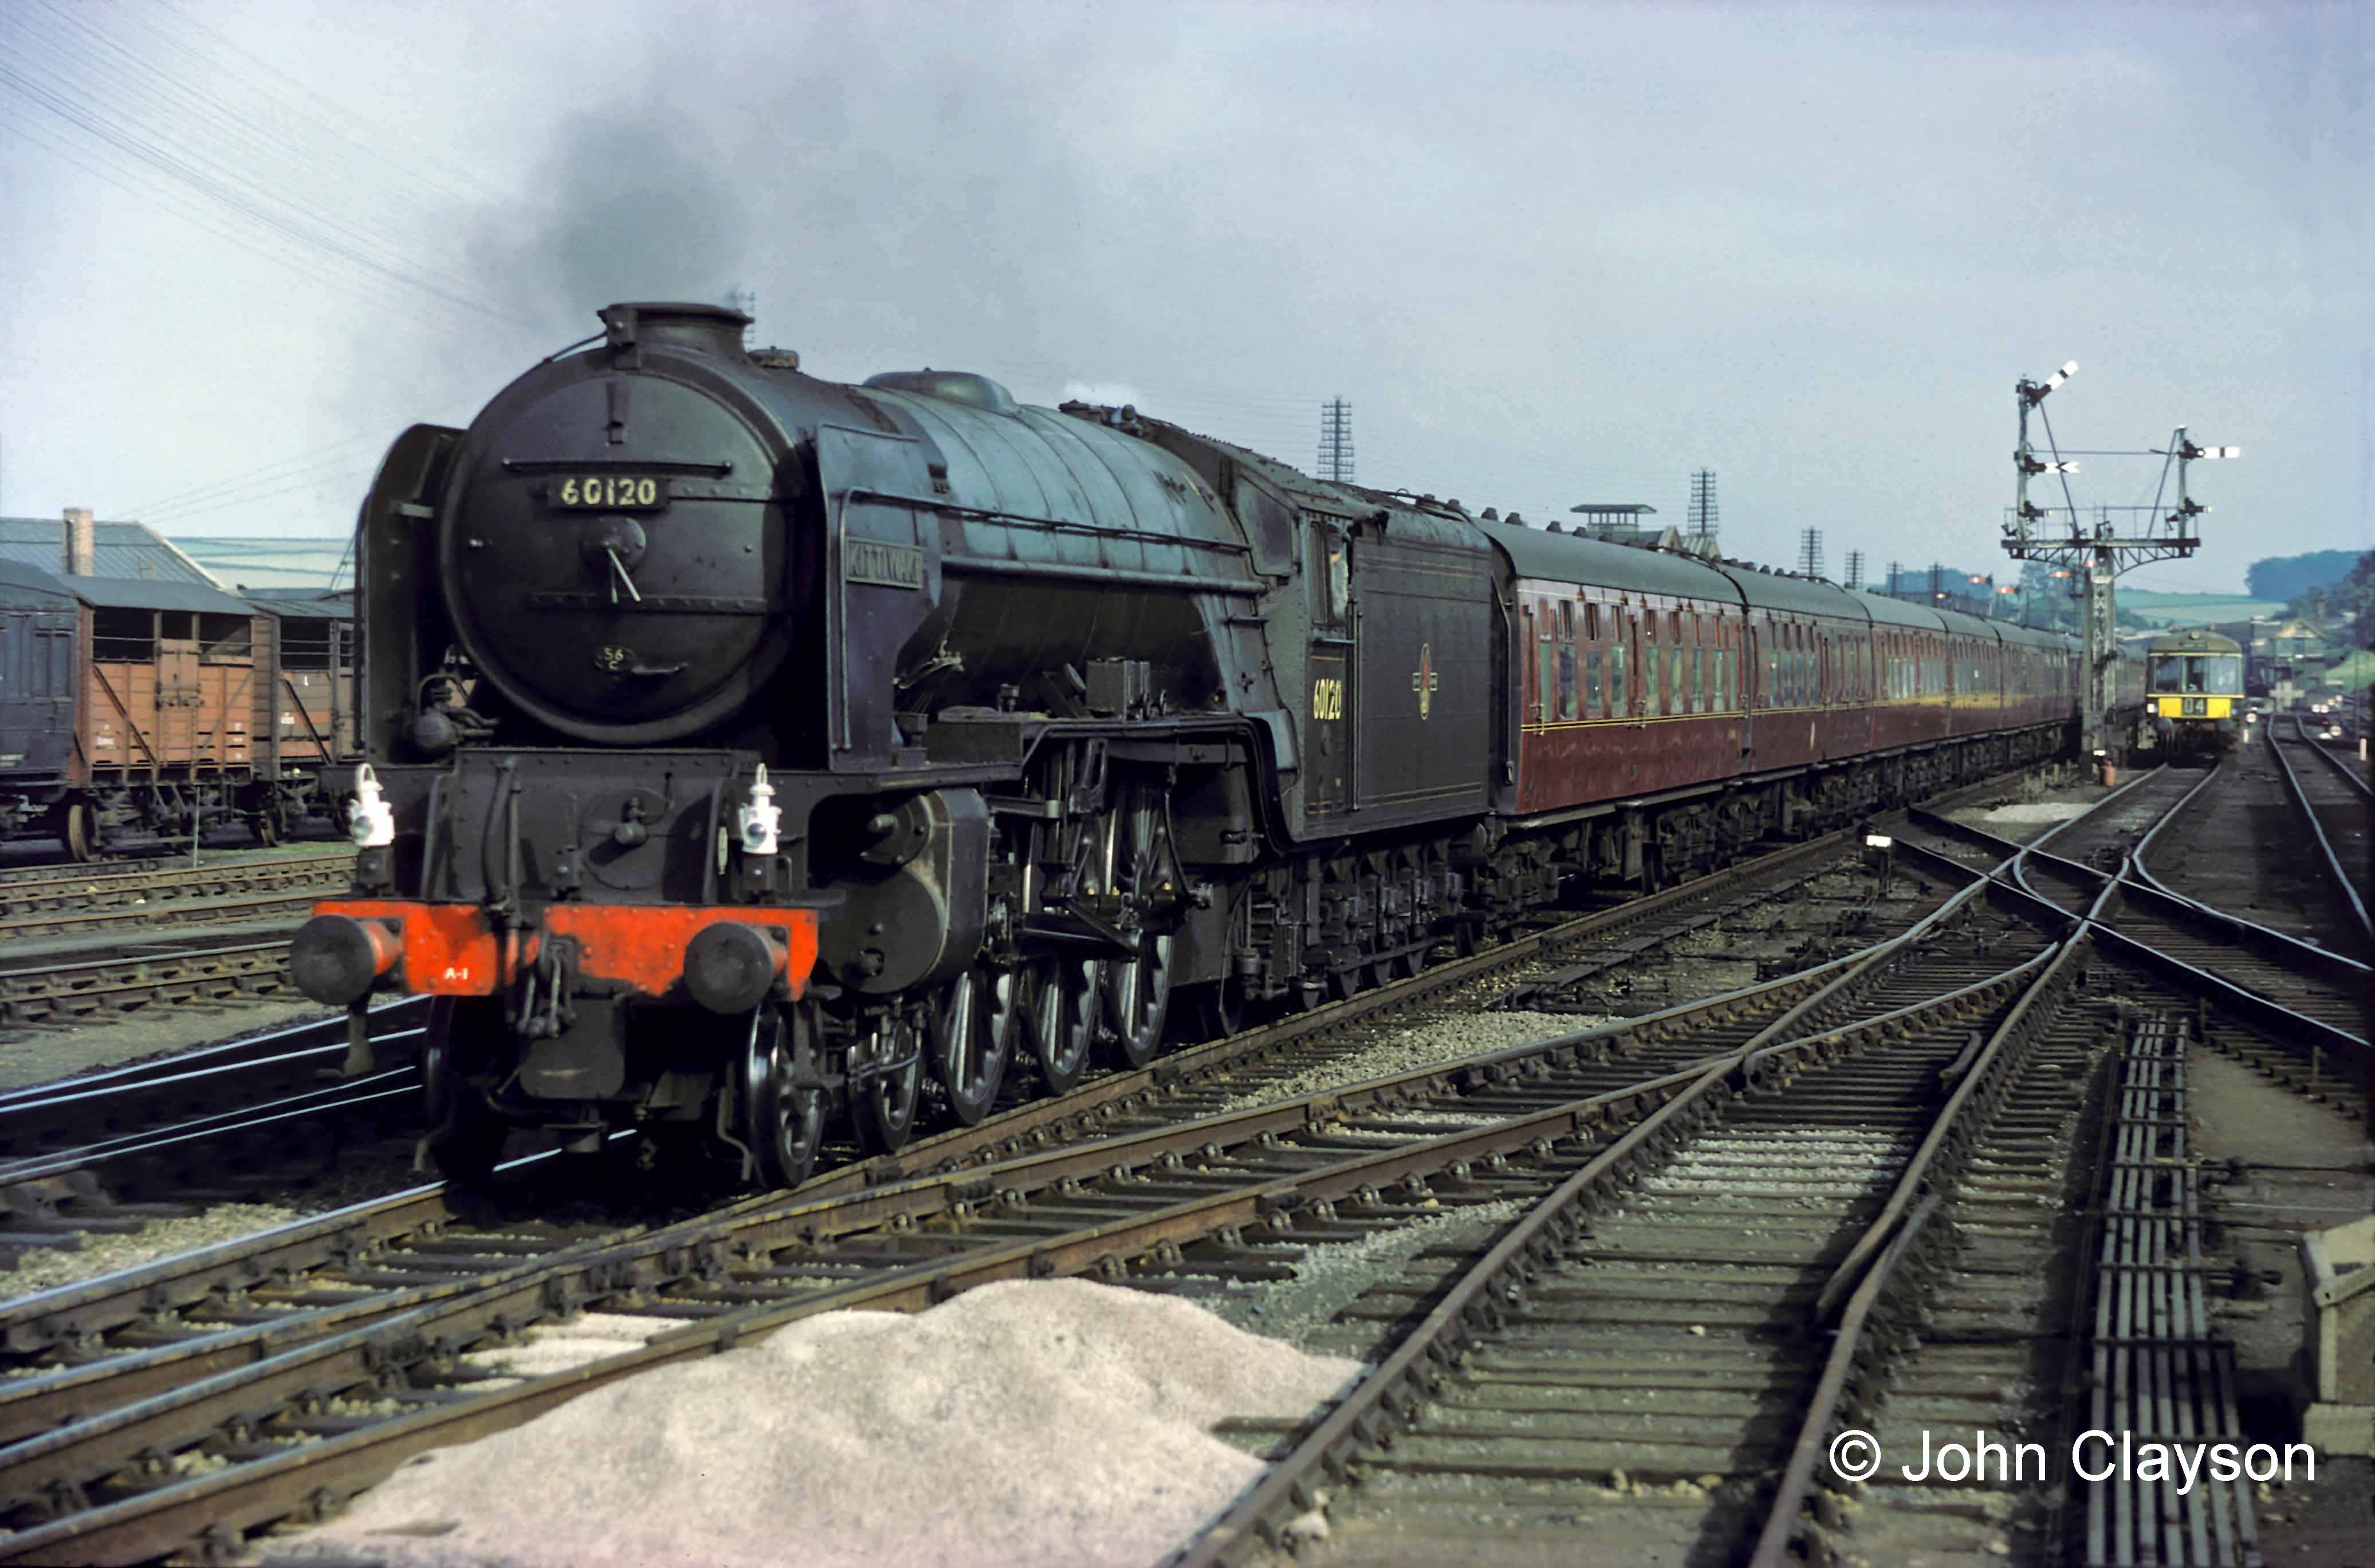
The semaphore signals at the approach to the station control both the Down Main Line - the three arms on the left hand post - and the Down Slow line - the two arms on the right hand post.
The two arms which are raised into the clear position show that the train 'has the road' through the station and is not required to stop. The upper arm was controlled jointly by the South Box (as its starting signal) and the Yard Box (as its home signal). There was a slotting arrangement on the post so that the signal arm was raised only when its respective levers in both boxes were pulled over. Beneath it is the North Box distant signal, requiring another slotting mechanism to co-ordinate its movement with the arm above. There is a third, smaller signal arm just above the gantry bracket. This was a 'calling on' signal, used by the Yard Box signalman to permit entry to the platform under caution when the line was already occupied. It would be used, for example, when a vehicle was being attached to, or detached from, the rear of a stationary train.
The signals on the right hand post controlled the Down Slow line in a similar way, but without a distant signal arm at this time.
Photograph by Cedric A. Clayson
The driver of the railcar (diesel multiple unit) on the right has stopped on the Down Slow line waiting for one of the right hand signals to clear, which will allow it to run into the Western platform.
The South Box can be glimpsed in the distance, immediately to the right of the railcar.
Photograph taken in late June 1962 by Cedric A. Clayson.
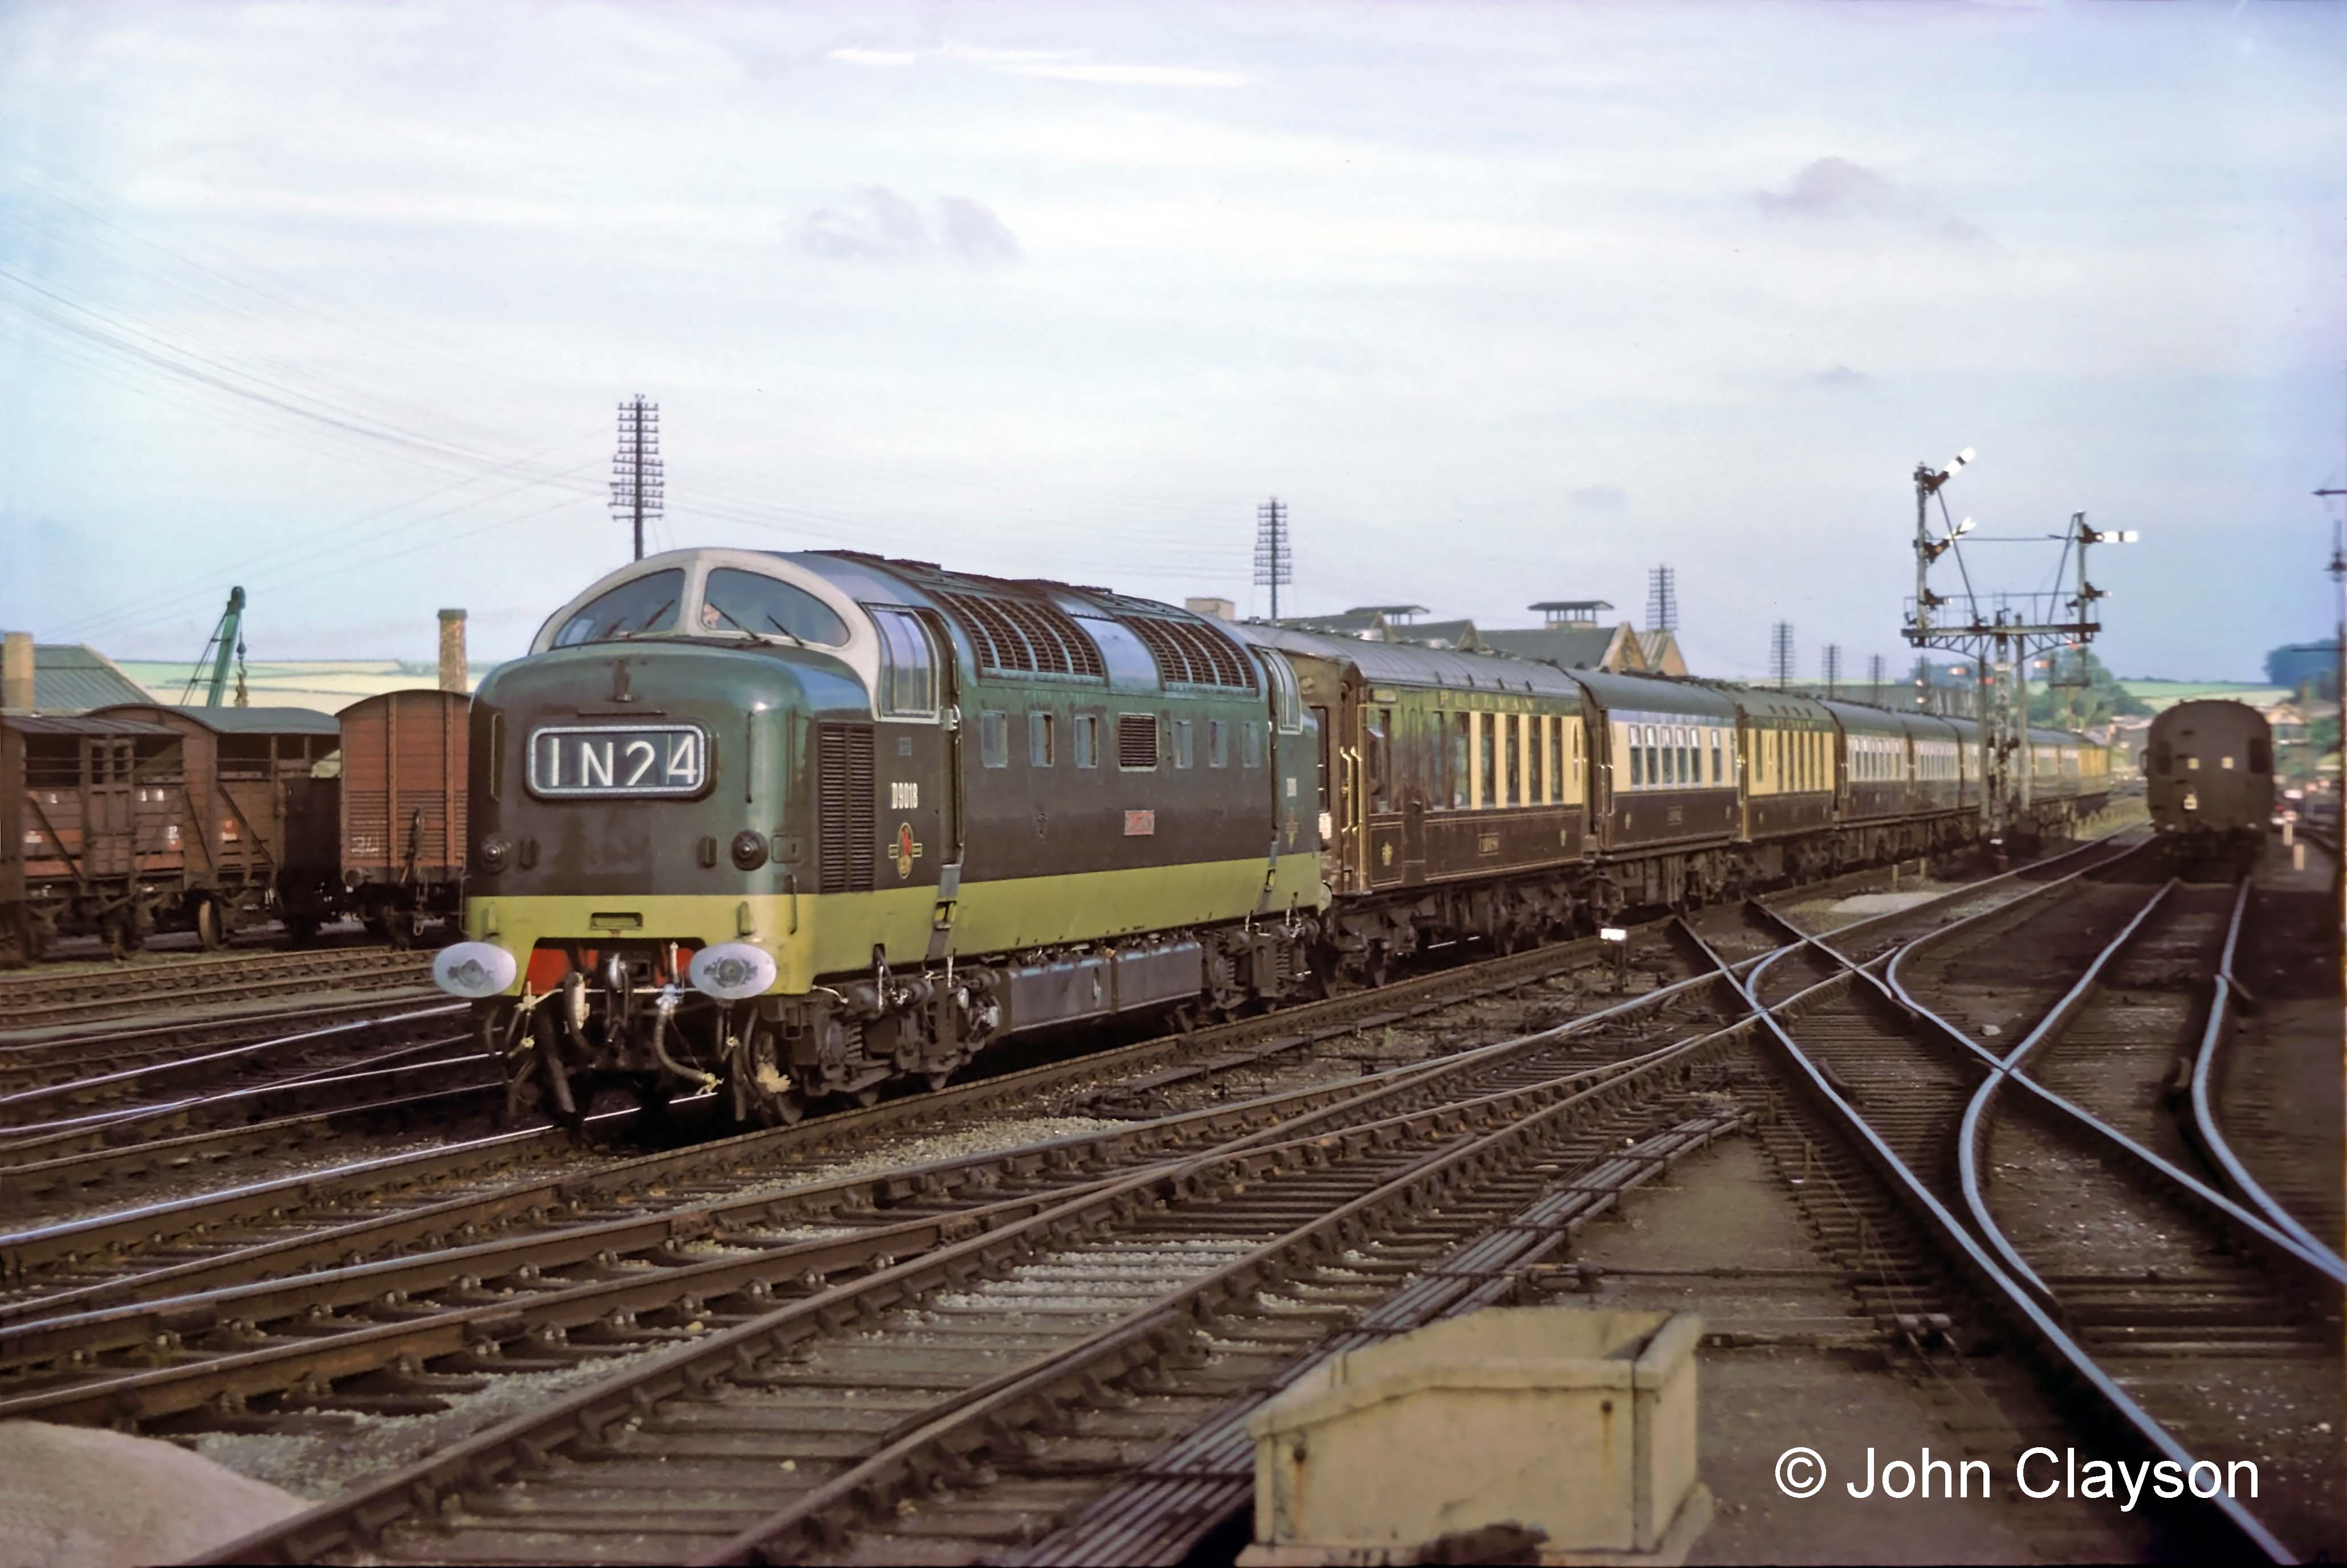
The Junction for the Up Goods Line
An Up Goods line, which continued for four miles to Highdyke, commenced at a junction controlled by Grantham Yard signal box.
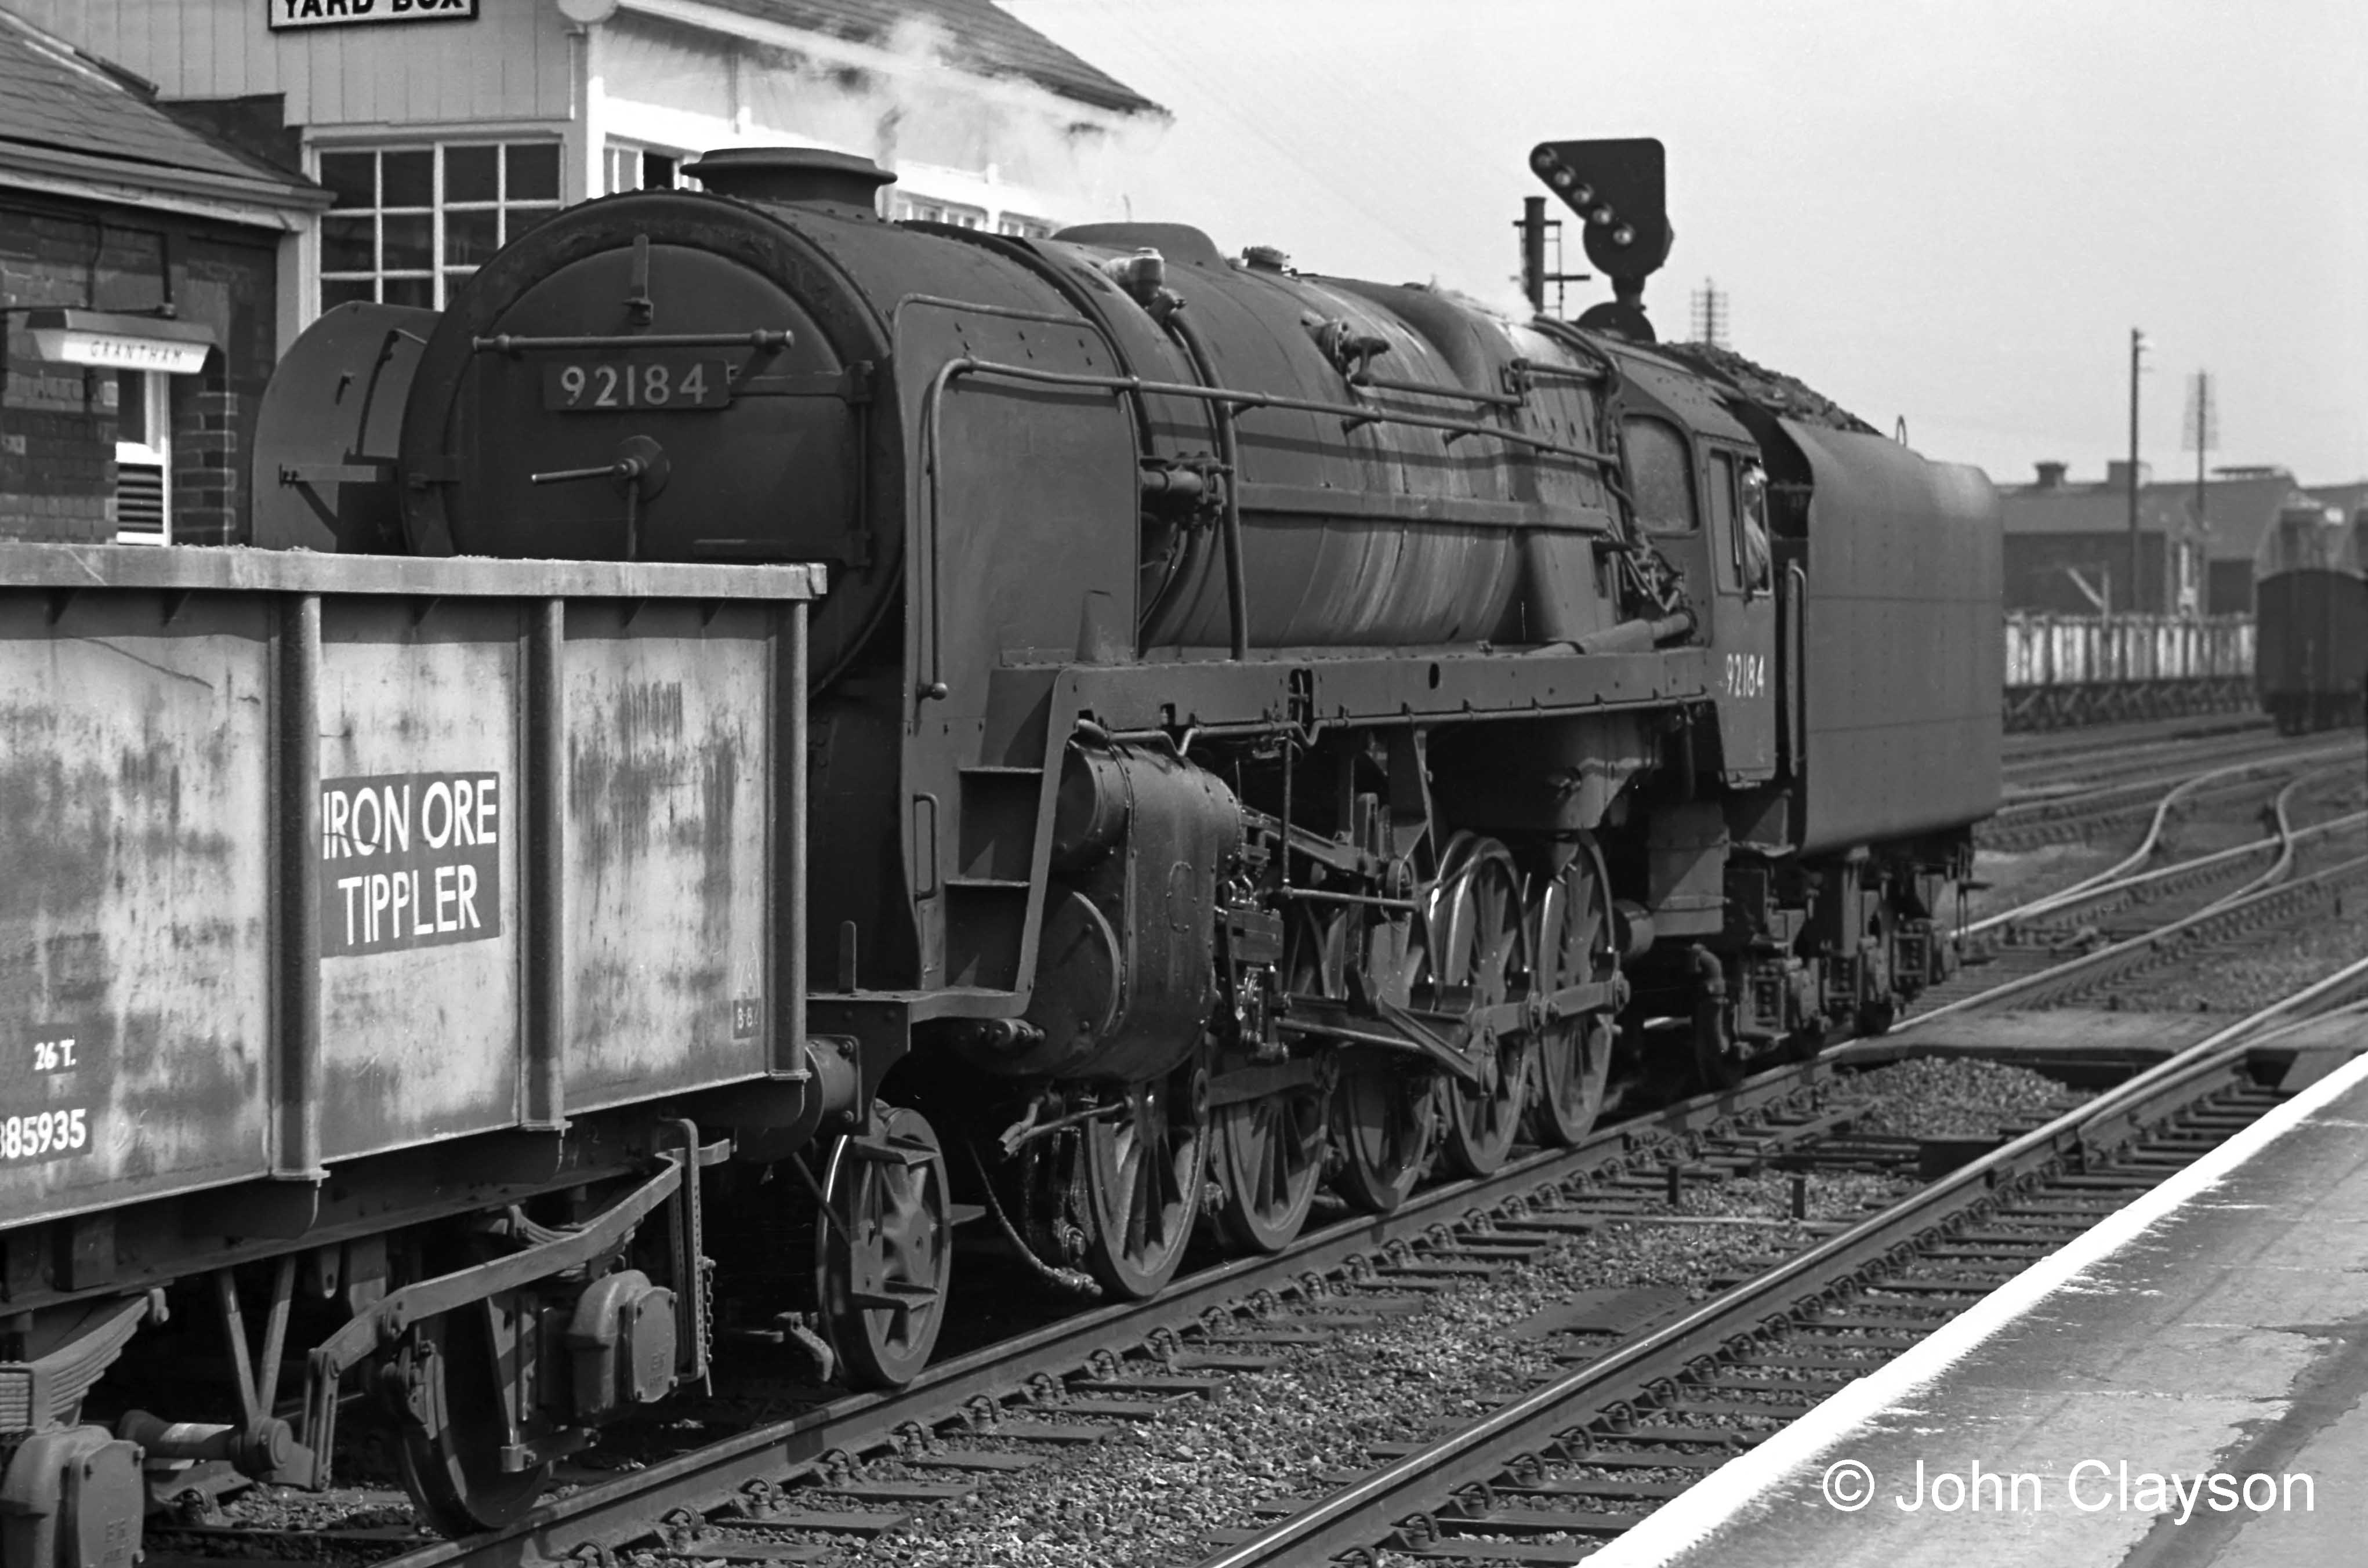
Projecting above the level of the cab is an inclined row of illuminated white lights attached to the colour light signal. This shows that the train is signalled to take the connection into the Up Goods Line at the points just beyond its tender. It will use the Goods line, alongside the Up Main line, from here as far as Highdyke, where it will be crossed over to the Down side to enter the reception sidings for the Stainby Branch. The Goods Line kept slower trains, such as this one, out of the path of the expresses, especially important because the route climbs continually from here to Stoke Summit, one mile beyond Highdyke. The gradient reduced the speed of heavy goods and mineral trains even more, so the Goods Line had the same purpose as a crawler lane on a long motorway ascent.
The term ‘Iron Ore Tippler’ indicates that the wagons have no doors – they were emptied by being tipped upside down in unloading plant at the steelworks.
Photograph by Cedric A. Clayson.
Here is a link to another photograph which shows the 'feather' illuminated.
Connections between all lines and the south end of the Western Platform
Photograph taken in late June 1962 by Cedric A. Clayson.
Locomotive Changes
Until the early 1960s Grantham was a regular locomotive exchange point on the East Coast Main Line. Changes on southbound trains were all managed from the Yard Box. There was an engine spur which connected with the Up Goods line, where a locomotive awaiting the arrival of its train could wait without obstructing other traffic.
Here is a link to a photograph showing a locomotive change taking place in the early 1960s. The A4 locomotive on the left has brought the train behind it in from the north and is drawing forward to make its way to the shed. The A3 locomotive on the right will back down to take the train forward to King's Cross.
Track Diagram, 1967
Malcolm Rush visited Grantham Yard signal box on Wednesday 4th January 1967 to sketch the track diagram, take a photograph and make notes. Malcolm's drawing, photograph and notes, along with links to an exterior photograph and other information, can be seen here. This was part of a wider project involving visits to record similar details at 184 signal boxes.
Forward to An outline history of Grantham Yard signal box
Back to the Grantham Yard signal box index page
Copyright note: the article above is published with the appropriate permissions. For information about copyright of the content of Tracks through Grantham please read our Copyright page.
Hi. I am modelling Grantham in 4mm scale (P4). I am trying to get the area around Yard box reasonably accurate. Can anyone give me an idea of the overal height of the big bracket signal on the up main. I am working out most of the dimensions but an overal height measurement would be very helpful.
Thanks in advance for any help.
Mike Wakefield.
Hello Mike,
I haven't seen any records which include a measured height for the signal …but you never know, someone, somewhere may have, or may know of, an original S&T department drawing of the structure. Have you tried the GNR Society (https://www.gnrsociety.com/)?
John Clayson
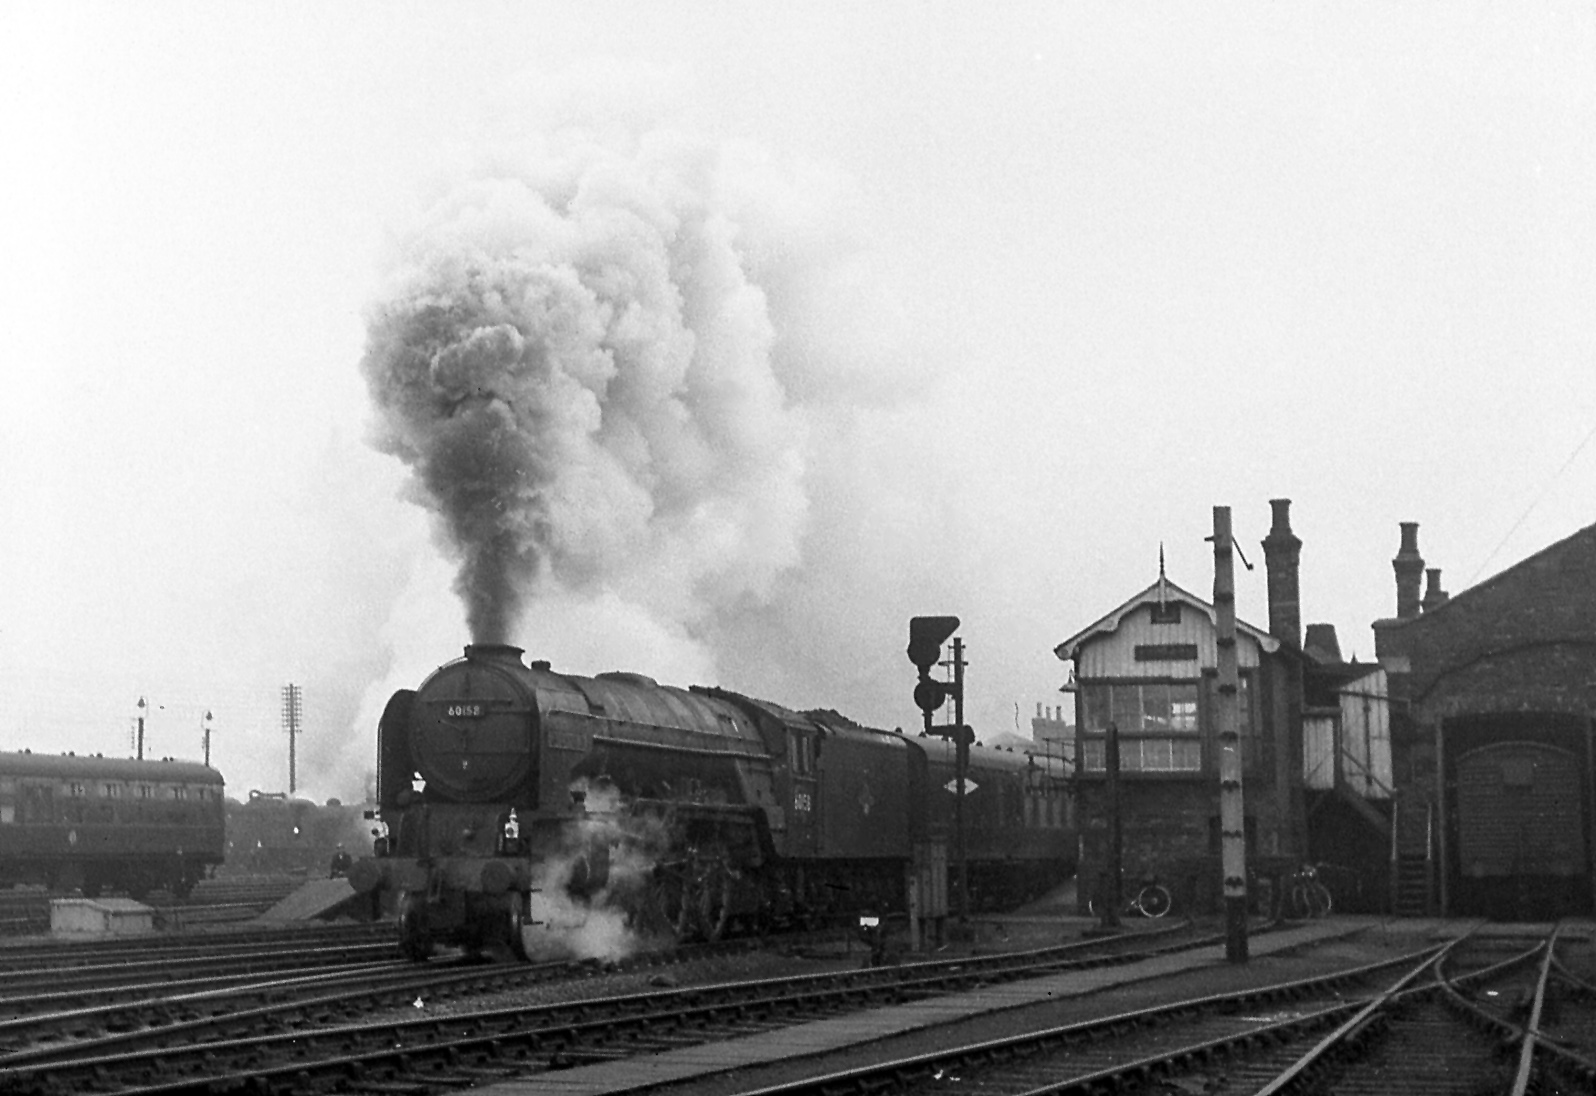
These are some great photographs of Grantham in the early 1960s. Here is a subject that has nothing to do with the railways. I had often wondered how long the electricity pylon that is viewable in the photograph of B1 61162, above its cab, on 9th April 1964 had been there. In the photo taken on 3rd Oct 1963 the pylon is not there. This gives me a rough idea as to the time when the pylon was put in.
Does any one know about the white signal gantry which is situated past the south parade railway bridge about a mile on the up slow/mainline? When was it installed?
Thank you,
Tim Auckland
Hello Tim,
Thank you for getting in touch. We can't help with information about date the the electricity transmission line was installed. You could try contacting National Grid, or maybe the local newspaper The Grantham Journal will have information in its editions for the 1963-64 period. You can search the paper's archive online at The British Newspaper Archive, possibly for free at your local library. I've just checked and there's a report on the front page of the December 27th 1963 edition.
There have been signals in the area of the Saltersford water works for many years. If you go to the end of our page about Great Ponton signal box you'll find some information there. However, the current gantry isn't covered in this historical account.
Best wishes,
John Clayson